· 7 min read
leomYili

Test-Driven Development (hereinafter referred to as TDD) is a design methodology in which unit test cases are written before the functional code is developed, and tests are used to drive the entire development process.

This article describes in detail how to learn TDD in the process of creating the react-stillness-component component to complete the functional development and testing. For more details on how the component is implemented, see the previous article "How to implement keep-alive in react".

This article is written from the point of view of quality and functionality assurance in writing react components, which may require some prior knowledge of automation testing due to the terminology involved;

The focus of this article is mainly on how to design and why to use the tdd way to do component testing, any questions, but also welcome to discuss with the author 😁

II. I think the actual implementation process of tdd

First, a brief review of tdd:
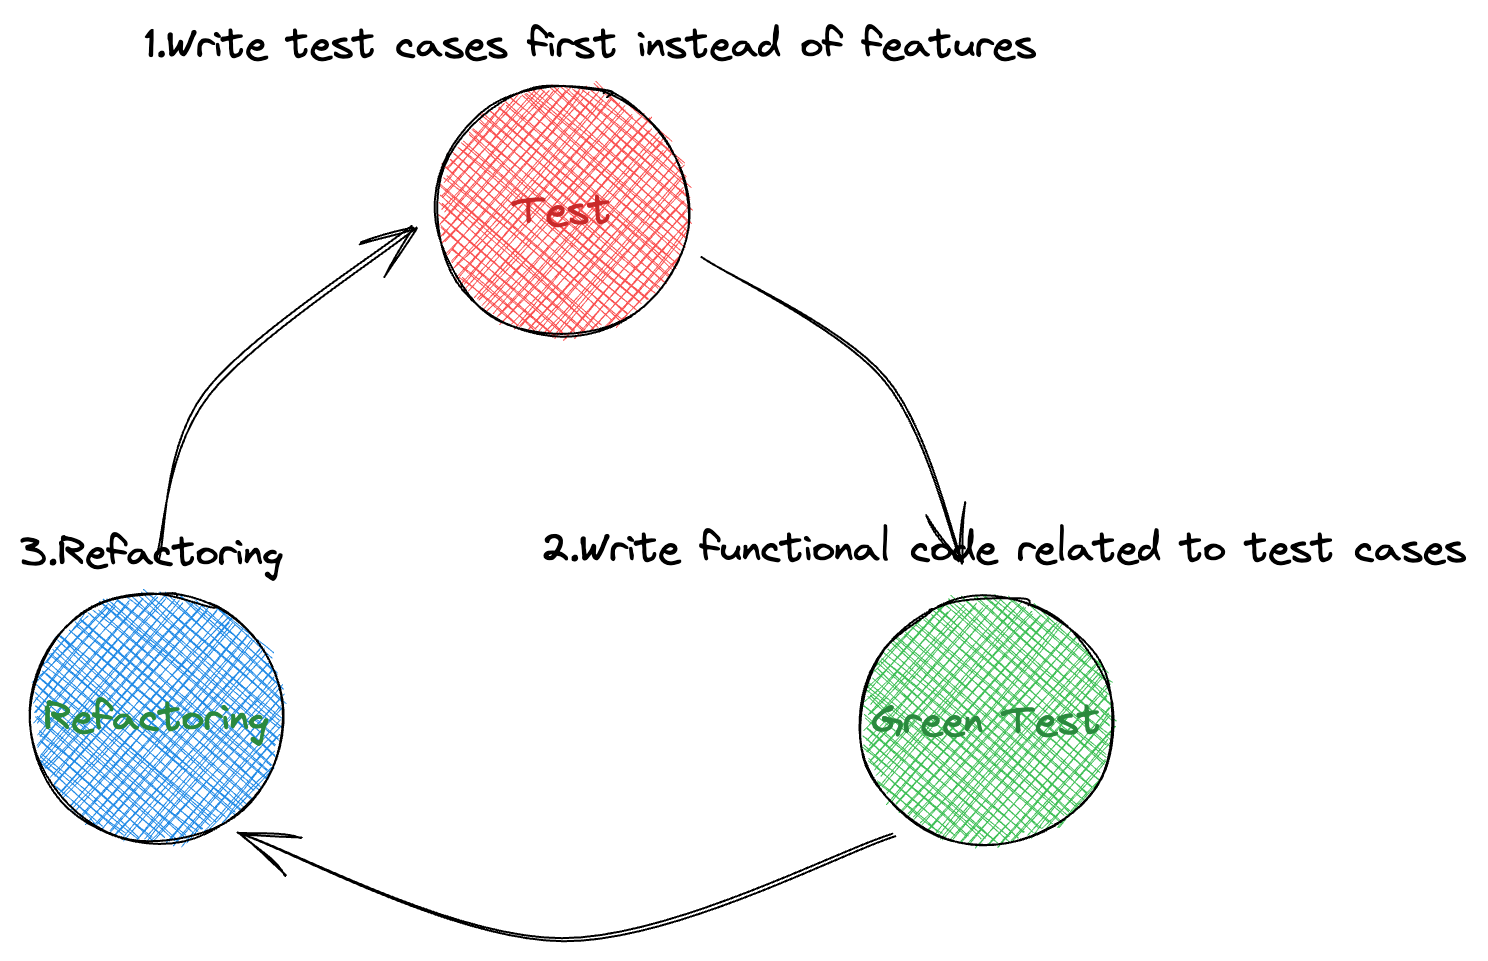
tdd

The actual behavior corresponding to this might be (from wiki)

  1. add a test case
  2. run the test case and get a failed result (because no functionality has been implemented yet)
  3. write the simplest code that just passes
  4. re-run the test case and get a successful result
  5. refactoring as needed, and ensure that each refactoring can pass the previous test cases
  6. repeat this step, until the completion of the entire development

Of course, in the actual development process, the author also made some modifications to the reality of the situation, first look at the process after the transformation:
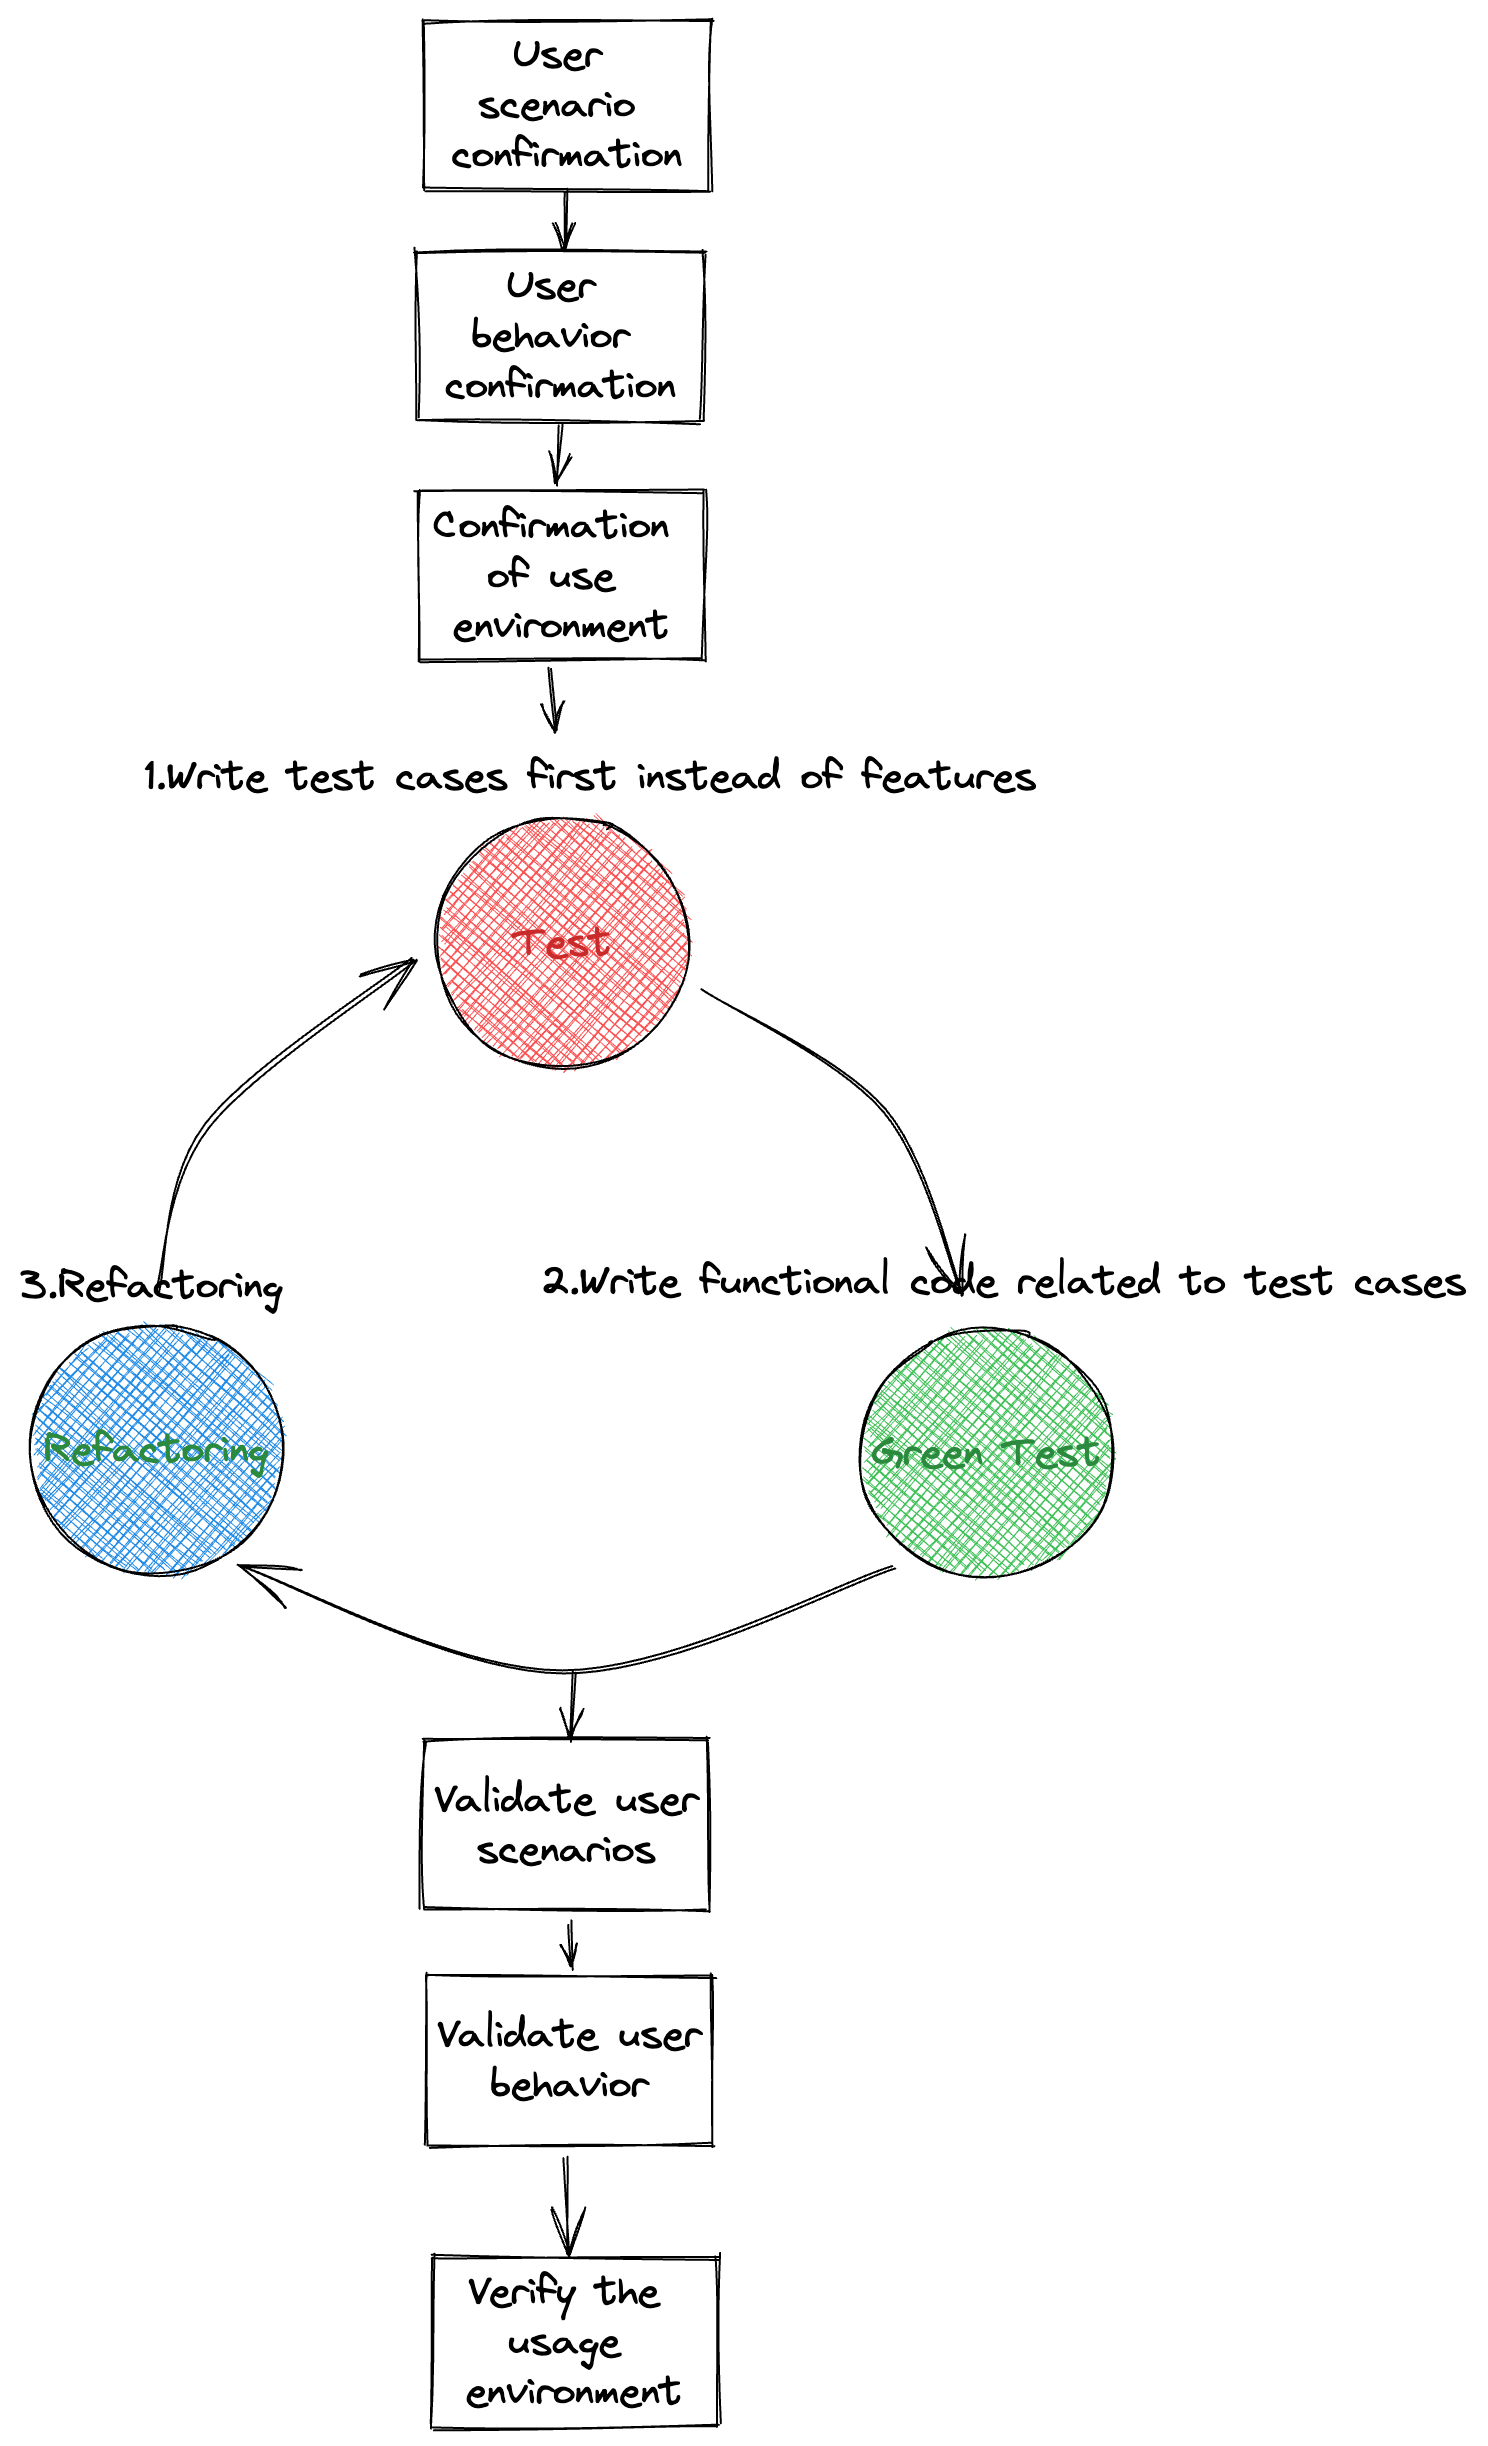
new flow

Here is mainly for the front-end component scenario added some more important steps

  • Identify the user scenario, under what circumstances to consider using this component? This includes scenarios involving general users and professional users. Need to consider the scenario involving UI framework
  • Confirm the user behavior, that is, what is the specific operation of the user? You can start from your own perspective, and then conduct actual research to observe how similar components are used
  • Confirm the user environment, which includes the modern browser environment and the framework itself in the development environment.

In each completed test case before writing the first is to confirm the link to ensure that the function does not deviate from the original intention; after each test, and then verify, and the means of verification can be BDD (will be mentioned later) can also be combined with the reality of online examples to consider, if you can solve the actual problem, then prove that the function has been completed.

Of course, as the author's own daily habit is to first list the plan 😂, this time is no exception:
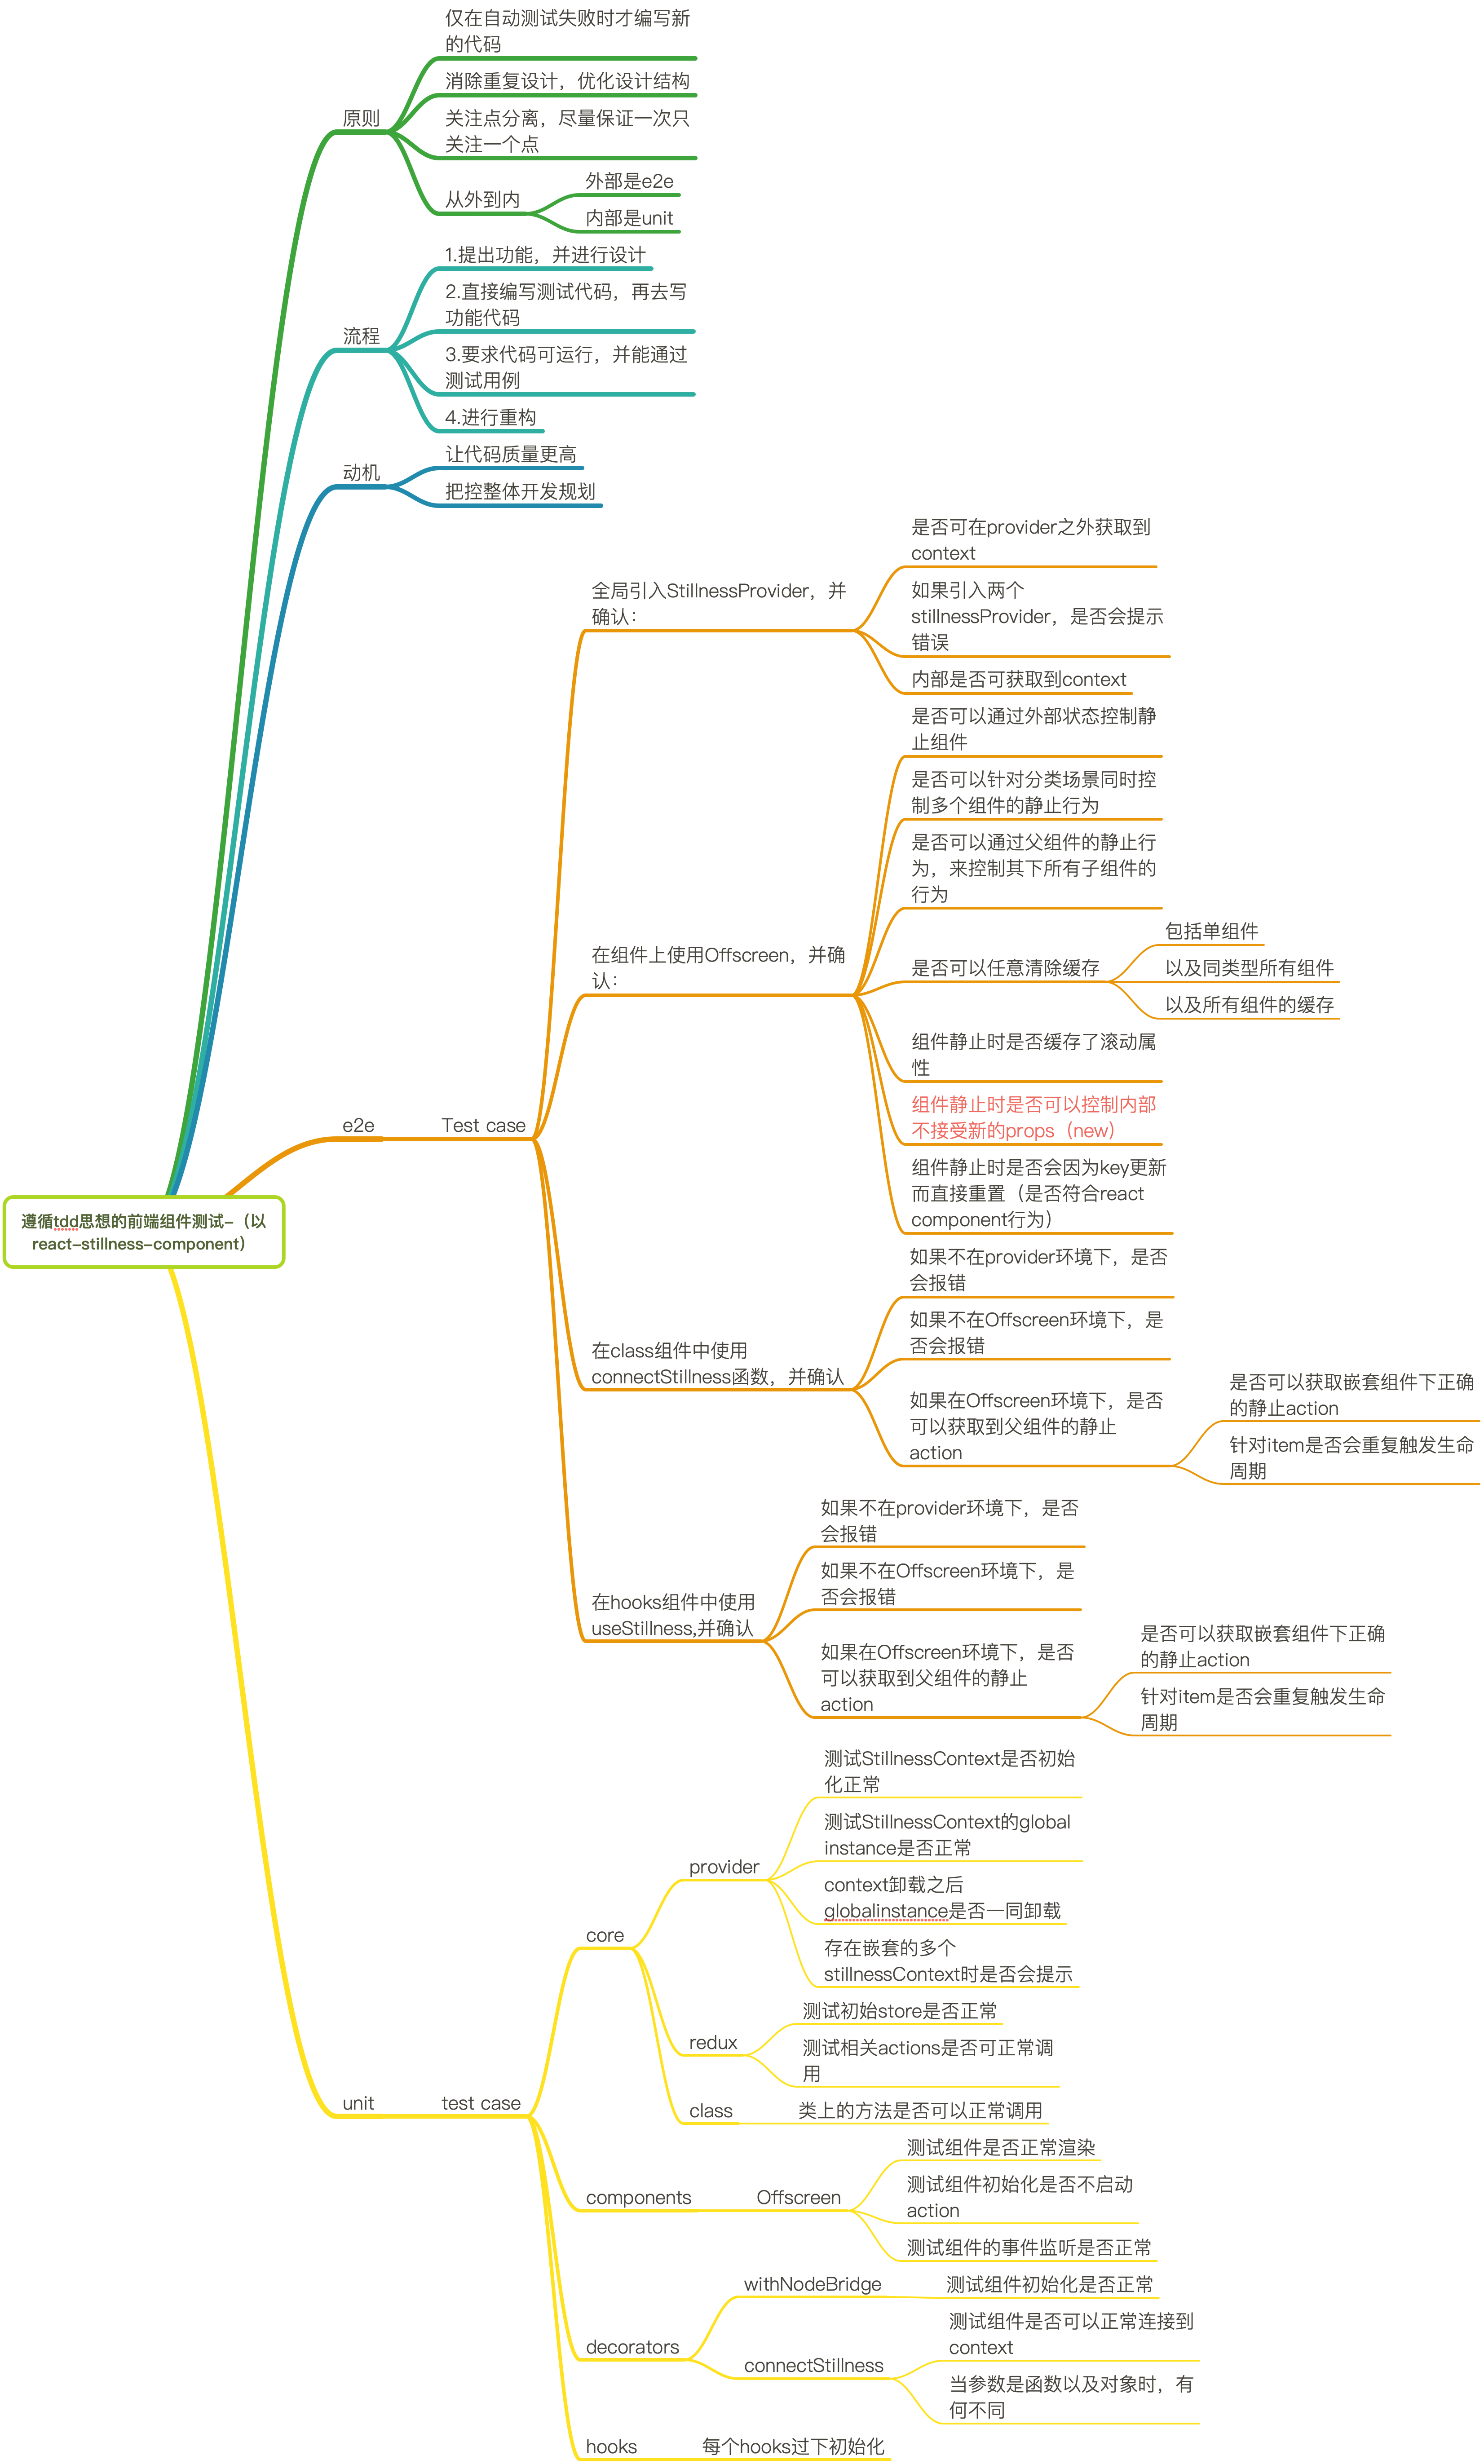
mind node1

As you can see the bottom part is the test case planning related to TDD, there will be additional cases in the actual writing process, so the second part is the e2e simulation test is the scope of use of the box, the first phase as long as it does not exceed.

The following look at the actual case

III. Actual cases

The test framework used in this paper is jest, the relevant configuration can refer to the first point of the summary of issues

provider

First of all, starting from the outermost layer, the component makes extensive use of context, so it is necessary to provide a global provider, because the value of provider comes from createStillnessManager(), so our first example is to determine whether provider will work properly when this method is provided

it('Verify that the StillnessManager is correct', () => {
let capturedManager;
let manager = createStillnessManager(); // let mockManager: any = jest.fn();

render(
<StillnessContext.Provider value={{ stillnessManager: manager }}>
<StillnessContext.Consumer>
{({ stillnessManager }) => {
capturedManager = stillnessManager;
return null;
}}
</StillnessContext.Consumer>
</StillnessContext.Provider>
);

expect(capturedManager).toBe(manager);
});

The difference between the two is that the mock approach filters out the interference from the provider when writing the code.

So we can now start the run test, and of course, since the code is already written, we can get a successful example with either real or mocked arguments.

And at the beginning, when the code is not written, you can follow the process and write the real code.

provider will have other functions besides initialization, of course, such as:

  • automatically clear the global cache object when unloading
  • prevent multiple provider nesting errors, the need to actively alert the user

And for these two points, we can continue to write test cases

it('stores StillnessManager in global context and cleans up on unmount', () => {
let capturedManager;

const { container, unmount } = render(
<StillnessProvider>
<StillnessContext.Consumer>
{({ stillnessManager }) => {
capturedManager = stillnessManager;
return null;
}}
</StillnessContext.Consumer>
</StillnessProvider>
);

const globalInstance = () => (global as any)[INSTANCE_SYM] as any;

expect(globalInstance().stillnessManager).toEqual(capturedManager);
unmount();
expect(globalInstance()).toEqual(null);
});

As you can see, the effect of simulating unloading is achieved by calling the returned method.

class Component

Let's look at the core of the library, <OffscreeenComponent>, the props of the original component are much more complex compared to the component wrapped in HOC

  • uniqueId: UniqueId;
  • parentId: UniqueId;
  • parentIsStillness: boolean;
  • isStillness: boolean;
  • stillnessManager: StillnessManager;

The test cases also revolve around these points, as an example:

it('Does it prompt an error message when there is no context?', () => {
global.console.error = jest.fn();

expect(() => {
render(
<OffscreenComponent
visible={true}
isStillness={false}
uniqueId="test1"
parentId={rootId}
parentIsStillness={false}
>
<div />
</OffscreenComponent>
);
}).toThrow(/stillnessManager is required/i);
});

component is no way to run in the absence of context, then we just exclude this parameter when writing the example, if the component catches the exception and throws it, it means that the function is ok, this is a relatively simple example

to see a more complex:

it('When the passed isStillness changes, clear the corresponding dom element or reload the original one', async () => {
const Demo = ({ isStillness }: any) => {
return (
<OffscreenComponent
visible={true}
isStillness={isStillness}
uniqueId="test1"
stillnessManager={mockStillnessManager()}
parentId={rootId}
parentIsStillness={false}
>
<div data-testid="content" />
</OffscreenComponent>
);
};

const { queryByTestId, rerender } = render(<Demo isStillness={false} />);

rerender(<Demo isStillness={true} />);
expect(queryByTestId('content')).not.toBeInTheDocument();

rerender(<Demo isStillness={false} />);
expect(queryByTestId('content')).toBeInTheDocument();
});

The isStillness property of the component is relatively important, but also used to control the conditions of the component is still or not, here through the real simulation of render, and by modifying the method of passing the reference, to directly simulate the effect, if passed true, the component should be rendered in the body, that is, to find the id for the content element must be able to find, and vice versa, can not find.

In this way, we can test the class Component.

For more examples, see Offscreen.spec.tsx

HOC

How is the HOC tested? Take the <Offscreen> component as an example:

Its props are:

  • visible:boolean, controls whether the component is static or not
  • type: string or number, identifies the type of the component, repeatable, the same type of static behavior will remain the same
  • scrollRest: boolean type, controls whether the component caches the scroll position when it is stationary

But these props are actually processed and passed to the <OffscreenComponent> component,

For the HOC itself, it just needs to ensure that it catches exceptions when the context is not found:

it('throw an error if rendered', () => {
console.error = jest.fn();

class TestClass extends React.Component<
React.PropsWithChildren<OffscreenInnerProps>
> {}

const DecoratedClass = withNodeBridge(TestClass);

expect(() => {
render(<DecoratedClass visible />);
}).toThrow(/Expected stillness component context/);
});

As for the above props, since it involves other modules, it belongs to the scope of BDD testing, which will be introduced in the next BDD testing related article

hooks

For hooks related, you need to use @testing-library/react-hooks This library can directly run hooks and assert the results

As an example:

Now there is a hooks useOptionalFactory that returns the latest results based on dependencies

The code is :

function useOptionalFactory<T>(
arg: FactoryOrInstance<T>,
deps?: unknown[]
): T {
const memoDeps = [...(deps || [])];
if (deps == null && typeof arg !== 'function') {
memoDeps.push(arg);
}
return useMemo<T>(() => {
return typeof arg === 'function' ? (arg as () => T)() : (arg as T);
}, memoDeps);
}

The code for the test case is :

import { renderHook, act } from '@testing-library/react-hooks';

const useTest = () => {
const [count, setCount] = React.useState(0);

const addCount = () => {
setCount(count + 1);
};

const optionFactoryFn = useOptionalFactory(
() => ({
collect: () => {
return {};
},
}),
[count]
);

return { addCount, optionFactoryFn };
};

describe('useOptionalFactory', () => {
let hook;
it('Depending on the variation of the dependency value, different results are generated', () => {
act(() => {
hook = renderHook(() => useTest());
});

let memoValue = hook.result.current.optionFactoryFn;

act(() => {
hook.result.current.addCount();
});

expect(memoValue).not.toStrictEqual(hook.result.current.optionFactoryFn);
});
});

By using renderHooks() and act(), you can simply test, and when the test dependencies change, the return value will follow the change.

IV. Summary of questions

  1. How to set up the test environment?

    The overall architecture is lerna+Typescript+React+rollup+Jest, in fact, the community also has a lot of examples, here only to introduce the problems encountered in the process of building,

    • How to build a separate test environment for sub-packages? lerna's architecture, a good separation of the environment of each package, you can use different test frameworks in each sub-package, individually configured, for example: 13 can be configured differently in each package
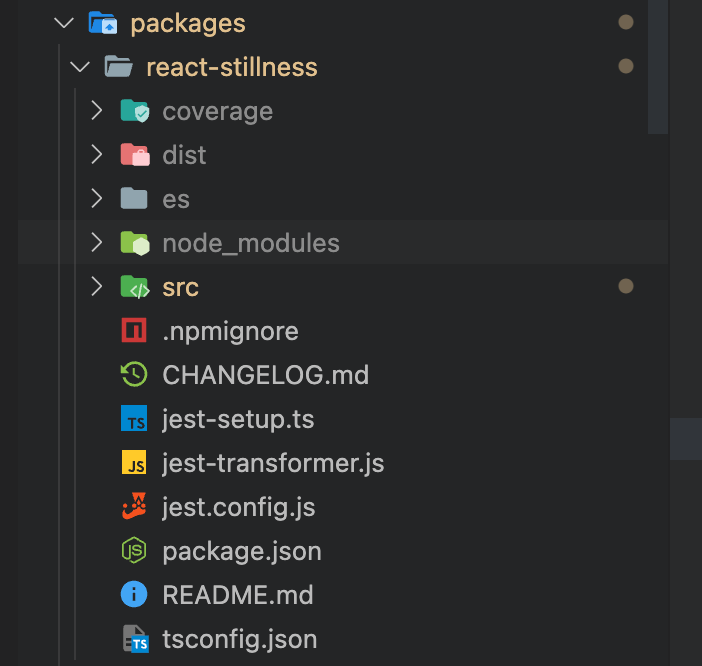
    • Test code also want to use Typescript?

      // jest-transformer.js
      const babelJest = require('babel-jest');

      module.exports = babelJest.createTransformer({
      presets: [
      [
      '@babel/preset-env',
      {
      targets: {
      node: 'current',
      esmodules: true,
      },
      bugfixes: true,
      loose: true,
      },
      ],
      '@babel/preset-typescript',
      ],
      plugins: [
      ['@babel/plugin-proposal-class-properties', { loose: true }],
      '@babel/plugin-transform-react-jsx',
      ['@babel/plugin-proposal-private-methods', { loose: true }],
      [
      '@babel/plugin-proposal-private-property-in-object',
      { loose: true },
      ],
      '@babel/plugin-proposal-object-rest-spread',
      '@babel/plugin-transform-runtime',
      ],
      });

      //jest.config.js
      module.exports = {
      setupFilesAfterEnv: ['./jest-setup.ts'],
      testMatch: ["**/__tests__/**/?(*.)(spec|test).[jt]s?(x)"],
      // testRegex: 'decorateHandler.spec.tsx',
      transform: {
      "\\.[jt]sx?$": "./jest-transformer.js",
      },
      collectCoverageFrom: [
      '**/src/**/*.tsx',
      '**/src/**/*.ts',
      '!**/__tests__/**',
      '!**/dist/**',
      ],
      globals: {
      __DEV__: true,
      },
      };

      Just add the transform configuration

  2. How do I test the actual rendering?

    You can use @testing-library/jest-dom, which provides related jest matchers on the DOM state, which can be used to check the tree, text, style, etc. of elements, which are also introduced in this article. Some of them, such as:

    • toBeInTheDocument: to determine the existence of elements in the document
    • toHaveClass: to determine whether the given element in its class attribute has the corresponding class name
    • toBeVisible: determine whether the given element is visible to the user
  3. What if I want to test a particular example individually?

    //jest.config.js
    module.exports = {
    setupFilesAfterEnv: ['./jest-setup.ts'],
    //testMatch: ["**/__tests__/**/?(*.)(spec|test).[jt]s?(x)"],
    testRegex: 'decorateHandler.spec.tsx',
    transform: {
    "\\.[jt]sx?$": "./jest-transformer.js",
    },
    collectCoverageFrom: [
    '**/src/**/*.tsx',
    '**/src/**/*.ts',
    '!**/__tests__/**',
    '!**/dist/**',
    ],
    globals: {
    __DEV__: true,
    },
    };

    可You can simply modify the configuration file, use testRegex for a file to test, of course, here the author only listed their own think more simple method, if there is a more simple method, welcome to propose 👏👏

  4. How to automate testing?

    The automated process in the component repository is reflected in the push branch and the automated github release process

    // package.json
    "scripts": {
    "test": "jest --projects ./packages/*/",
    "test:coverage": "jest --coverage --projects ./packages/*/",
    "precommit": "lint-staged",
    "release": "bash ./scripts/release.sh",
    "lint:staged": "lint-staged",
    "ci": "run-s test:coverage vs git-is-clean",
    },
    "lint-staged": {
    "*./packages/**/*.{js,ts,json,css,less,md}": [
    "prettier --write",
    "yarn lint"
    ],
    "*./packages/**/__tests__/**/?(*.)(spec|test).[jt]s?(x)": [
    "yarn test"
    ]
    }

V. Summary

This article summarizes how to think and organize the test code in the process of writing a react component, of course, in the actual production development stage, there is a certain amount of testing time is the most valuable, but also TDD test can be implemented on the basis of, if the TDD test to ensure the basic functionality, then BDD test is to expand the use of scenarios;

According to the proportion of the code, the author himself believes that TDD accounts for 70%, while BDD is the remaining 30%;

This is a cost-effective consideration, after all, in daily work, the requirements are changed very frequently, which means that the component may encounter a variety of different scenarios, and most of the TDD test cases can still be retained, but the BDD test is not necessarily.

This is the "front-end how to do component testing" of the first, if there are any questions, welcome to discuss.
· 9 min read
leomYili

Project-related address: react-stillness-component, the test rate has reached 90%, welcome to try it!

Official history related discussion: address

Latest react18 official solution discussion: address

This article describes in detail how to conceive and implement a component with a global state cache react-stillness-component.

I. Preface - Analysis of existing similar components

The normal scenario where authors need to write additional generic components is when they encounter special problems, and existing components are not implemented or would be very costly to develop new components.

In the case of component caching, a good choice for the community would be React Activation, which renders the component in an external hidden component Hierarchy, and then move the component into the corresponding container of the corresponding component through DOM operations when the component is actually rendered, so that the caching of the component can be controlled by the following syntax:

import KeepAlive from 'react-activation'

// The components in keepAlive are actually rendered in advance to the external Keeper
// Then when keepAlive starts rendering, the corresponding dom nodes are moved here using the data stored in Keeper
...

function App() {
const [show, setShow] = useState(true)

return (
<div>
<button onClick={() => setShow(show => !show)}>Toggle</button>
{show && (
<KeepAlive>
<Counter />
</KeepAlive>
)}
</div>
)
}

...

In the react18 before has been considered a relatively good method, but for our scenario there are still several problems:

  1. the old project code is very large, the implementation of the above method will bring the impact on the dependence on the life cycle order of the function, such as the ref value, although you can setTimeout to delay the acquisition, but one is a slightly large cost, another need to change the previous writing method, the project everywhere in the setTimeout will also affect the reading of the code and code review
  2. context is actually the same, but compared to the above situation is much better, just need to switch to react-activation to provide the createContext that can be
  3. synthetic event bubbling will fail, which is the fundamental reason for not using the above solution, the author's team will have a multi-dimensional table and other complex components, for drag and drop hover positioning will have certain requirements, caching compared to the experience can only be considered an optimization, can not affect the main function.
  4. In manual caching you need to add name to each <KeepAlive> component, which also adds some cost.

If it is for new projects, the library can actually reach the production environment level.

II. The ideal effect

Here the ideal effect is the author's ultimate goal.

First of all, the effect of keepalive can only be considered icing on the cake, it can not affect the development of other features in the project, so similar context, event bubbles, animations and so on can not be affected. 2. 2. at the same time, the cost of getting started can not be too high, api to be simple enough, similar to manually increase the unique identity and management of the way the cost is a little high, it is best not to declare the unique identity, but also to manually uninstall. 3. performance first, lazy loading, true removal of DOM nodes. 4. 4. need to remember the component-level scrolling effect. 5. solve the inconsistent caching effect in nested components, if only use a state to control whether to cache, the nested keep-alive components will not be able to real-time update. 6. unified data communication mechanism and local updates

Therefore, in response to the above objectives, the authors finally chose `Portals' and redux (to manage the cache state) to solve these problems

III. Implementation principle

Let's start with a pseudo-code

import { Offscreen,useStillness } from 'react-stillness-component';

...
function App() {
const [show, setShow] = useState(true)

return (
<div>
<button onClick={() => setShow(show => !show)}>Toggle</button>
<Offscreen visible={show}>
<Count />
</Offscreen>
</div>
);
}

...
function Count() {
const collected = useStillness({
collect: (contract) => ({
stillnessId: contract.getStillnessId(),
unset: contract.unset,
clear: contract.clear,
}),
});

return (
<div>
....
</div>
);
}
...

Compared to the current community's ability to utilize didMount, unMount, this is simplified to a prop, with associated hooks to support manual control of the cache.

The core is:

<Offscreen visible={show}>
<Count />
</Offscreen>

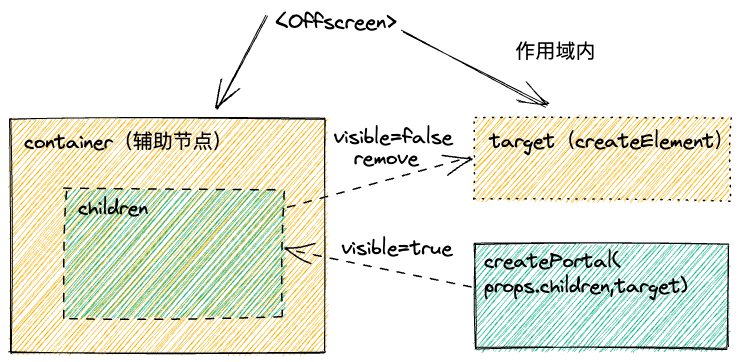
will not have a very familiar feeling, if the Offscreen replaced by div, visible replaced by visibility:visible|hidden, then it is just a piece of explicit logic to complete the actual effect of the cache 😬

Of course it's not that simple, otherwise there would be no need to develop a separate component, but this is really the way the author wanted the component to be used.

example of the principle

Convert to code:

...

targetElement = document.createElement('div');

// didMount
containerRef.current.insertAdjacentElement(
'afterend',
targetElement
);

ReactDOM.createPortal(props.children, targetElement)

...

Then it's time for the core extensions, which need to address the consistency of the behavior of the nested <keepAlive> related components and the overall cache control.

IV. Functional design

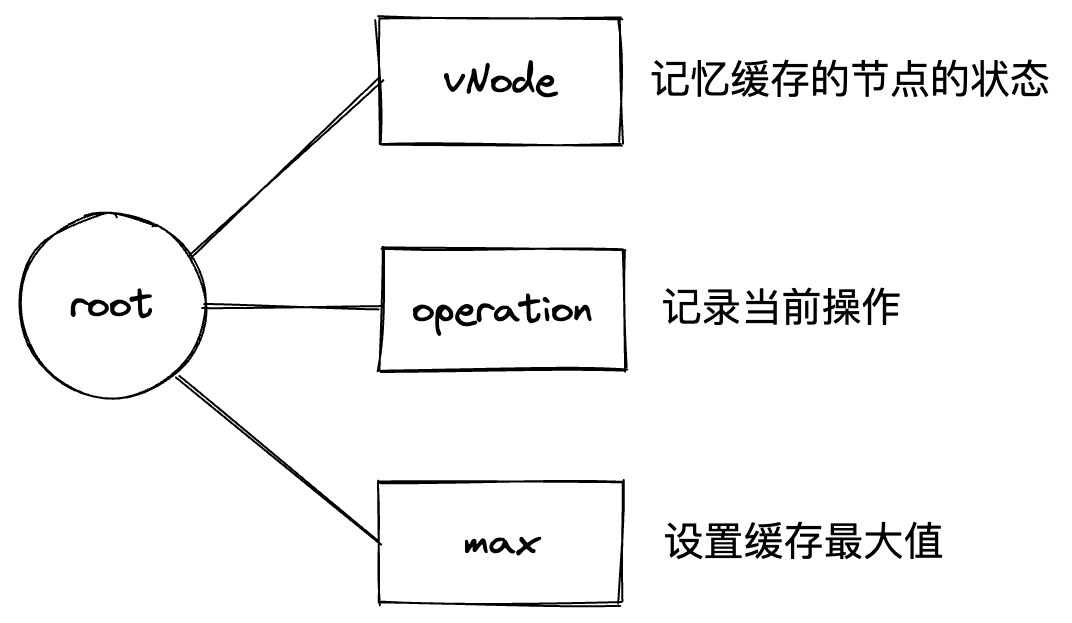
For performance reasons, the redux stores only the data mapping of the cache nodes, and after each cache node is loaded, a corresponding data node will be created synchronously. relationship with other nodes.

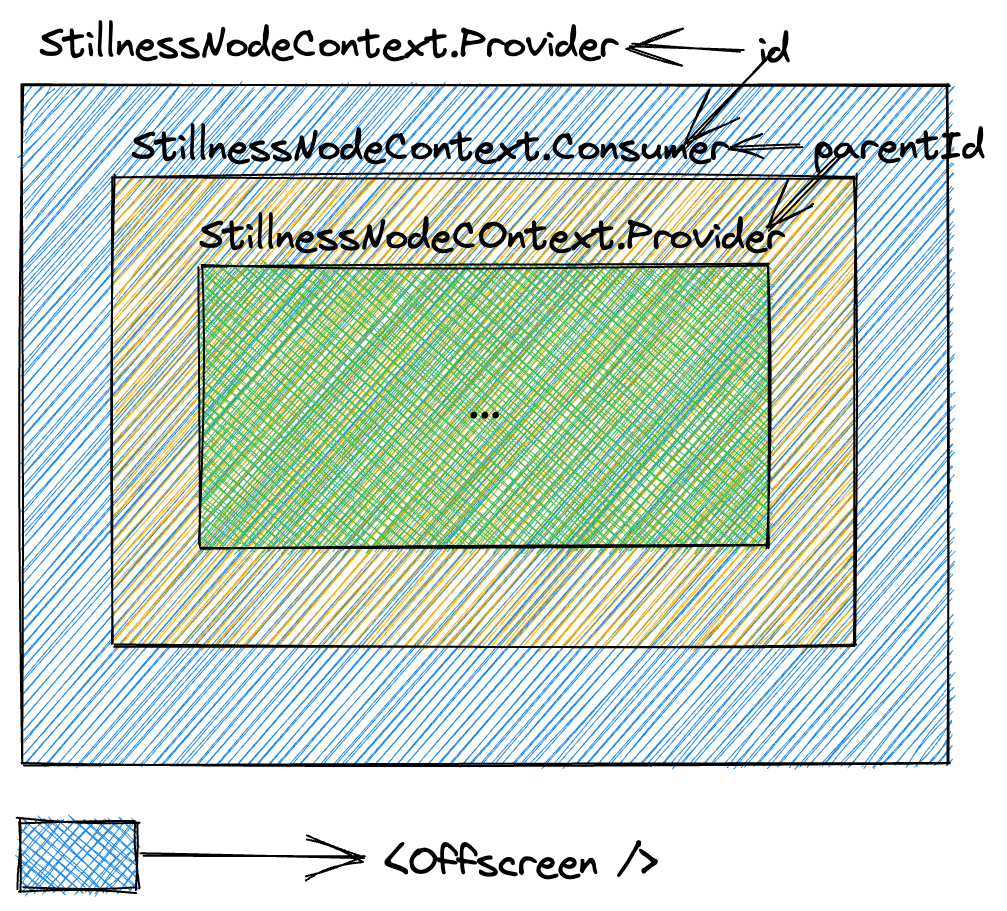
context application

Each layer just needs to get the id of the nearest StillnessNodeContext to build a mapping of nested component relationships,

So the focus of the work is as follows:

  • Cache node data state design
  • state synchronization between nodes
  • Performance optimization, lazy loading

1. state data structure design

state design

Here the vNode is represented as :

interface vNodeState {
uniqueId: UniqueId; // 唯一标识
type?: UniqueId; // 类型
parentId: UniqueId; // 父节点标识
visible?: boolean; // props中的显隐属性
isStillness?: boolean; // 计算之后真实的静止状态
}

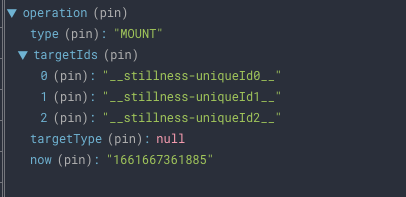
operation may not be easy to understand, but it is mainly used to mark some behavior that may affect the nodes in the global world, such as:

  • unset: reset the history of the static node
  • clear: reset the history of all static nodes
  • mount: A node has triggered a quiescent state
  • unmount: A node is released from the quiescent state

When any of the above events is triggered, it is necessary to generate dependencies on the starting node, and sometimes even to update all cache nodes.

max provides a way to control the cache automatically, when the user declares the maximum number of cache nodes, the component will automatically clear or add to the cache according to the rules (the first level <Offscreen> node will be counted as a node, and all its children will follow the parent node) and using the lru algorithm.

2. State synchronization

Synchronization here means that when a parent node triggers a quiescent operation, it needs to notify all its children in real time. Thanks to the design of the data structure, when a node triggers a quiescent or unquiescent operation, all nodes that need to change their state can be calculated based on uniqueId and parentId.

state synchronization

3. Performance optimization

Performance optimizations are mainly in two areas

  • Local updates: using redux, and the design of the state data structure, each node state update only affects the associated nodes
  • Lazy loading: In fact, the visible attribute on the <Offscreen> node can be optimized, if the visible attribute is false at the beginning, the children will not need to be loaded directly
useIsomorphicLayoutEffect(() => {
if (isMountRef.current) {
const parentIsStillness = globalMonitor.isStillness(stillnessParentId);
uniqueNodeRegistration.update({
...props,
parentId: stillnessParentId,
isStillness: parentIsStillness || !props.visible,
});

// 获取到真实静止状态
const thisIsStillness = globalMonitor.isStillness(
uniqueNodeRegistration.getUniqueId()
);

...

if (!thisIsStillness) {
setIsCurrentlyMounted(true);
}
}
}, [props, stillnessParentId]);

useEffect(() => {
if (isCurrentlyMounted === false) {
if (isMountRef.current) {
setIsCurrentlyMounted(true);
} else {
isMountRef.current = true;
}
}
}, [isCurrentlyMounted]);

const RenderedWrappedComponent = useMemo(
() => <Decorated {...wrapperProps} />,
[wrapperProps]
);

return isCurrentlyMounted ? RenderedWrappedComponent : null;

Just note here that it is possible that the parent node is already static, so the child node needs to be lazy loaded even though visible is true.

4. Scrolling state memory

Because the node will reset its scrolling position after DOM operation, we need to record the scrolling state of the first level dom node under <Offscreen>, and then set the value to restore it when it is lifted from the resting state

listenerTargetElementChildScroll = () => {
if (this.props?.scrollReset) {
this.targetElement.addEventListener(
'scroll',
throttle(
(e: any) => {
if (isRealChildNode(this.targetElement, e.target)) {
let index = this.cacheNodes.findIndex((el) => {
return el.node === e.target;
});

if (index !== -1) {
this.cacheNodes[index] = {
node: e.target,
left: e.target.scrollLeft || 0,
top: e.target.scrollTop || 0,
};
} else {
this.cacheNodes.push({
node: e.target,
left: e.target.scrollLeft || 0,
top: e.target.scrollTop || 0,
});
}
}
},
this,
120
),
true
);
}
};

Because of the parent-child nested components involved here, the author uses an event listener approach where the scrolling elements under each <Offscreen> node are remembered and stored in the scope of that node when a scrolling event is generated under it.

5. HOC

After solving the most important problem, the next step is to provide a variety of shortcut usage, the component supports the use of HOC and Hooks,

HOC just need to provide a spec can:

import { connectStillness } from 'react-stillness-component';

...

const spec = {
mounted: (props, contract) => {
return 'mounted';
},
unmounted: (props, contract) => {
return 'unmounted';
},
collect: (props, contract) => {
return {
isStillness: contract.isStillness(),
stillnessId: contract.getStillnessId(),
};
}
};

export const WithCount = connectStillness(spec)(CountComponent);
...

spec 参数可以参考

speccollect函数返回的值就是组件新的props;

6. Hook

Hooks方面主要有两个hook来帮助用户更好的完成缓存节点的控制

  • useStillnessManager:偏底层一些,将内部的方法也做了一定的归纳,并提供给用户进行自定义
  • useStillness:与connectStillness效果一致
import { useStillness, useStillnessManager } from 'react-stillness-component';

function Count(props) {
const stillnessManager = useStillnessManager();
// stillnessManager.getStore();

const [count, setCount] = useState(0);
const collected = useStillness({
mounted: (contract) => {
return 'mounted';
},
unmounted: (contract) => {
return 'unmounted';
},
collect: (contract) => {
return {
isStillness: contract.isStillness(),
stillnessId: contract.getStillnessId(),
item: contract.getStillnessItem(),
};
},
});

useEffect(() => {
console.log(collected);
}, [collected]);

return <div>...</div>;
}

The above is the overall architecture design. If you are interested, you can take a look at the source code, the structure is based on the idea of react-dnd, and you can also re-read how it is designed to separate the data state from the UI.

After that, we will show you the practical application of react-stillness-component.

V. Practical Exercises

The following examples are only written by the author according to his own situation, in fact, the component itself is very simple, there is no obvious compatibility issues, if there is a combination of other libraries can not achieve the effect, you are welcome to contact the author.

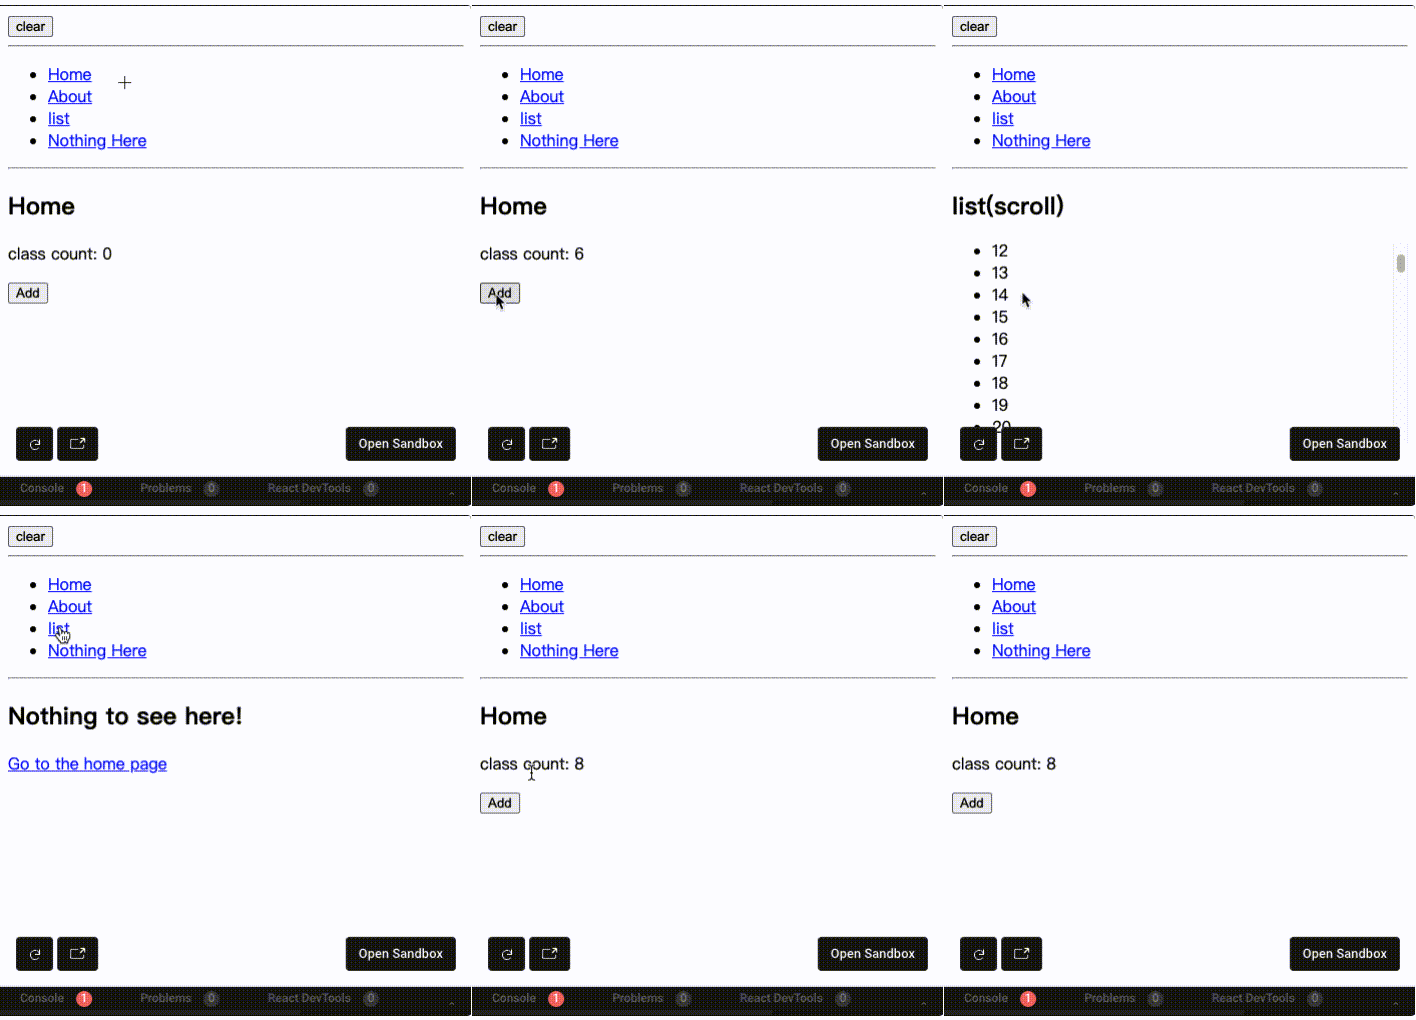
1. first is a simple demo

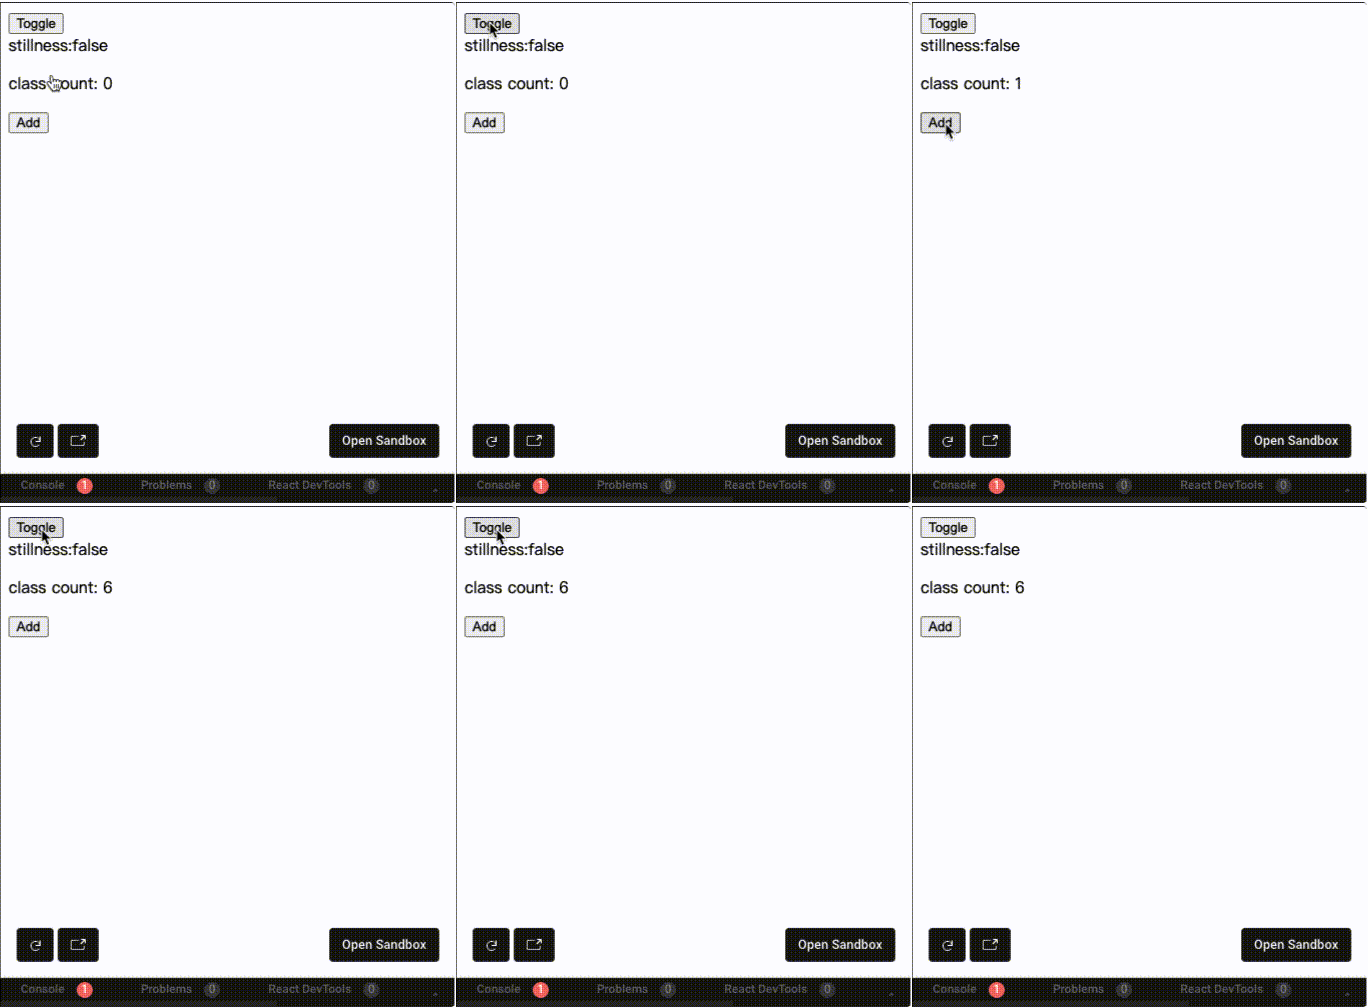
simple example

You can see the exact effect through online demo.

2. Then comes the most common react-router, which is divided into v5 and v6 versions

react-router v5

The main thing in react-router-v5 is the customization of the <Switch> component, which achieves the effect of route caching, for more details, [you can refer to](https://leomyili.github.io/react-stillness-component/zh-CN/ docs/examples/react-router/v5), and debug it yourself

react-router v6

react-router-v6 version is much simpler, just need to customize the outlet, you can achieve the effect of caching, the source code can refer to, and debug yourself

3. then is the application in the umi v3 framework, which is also the author's current team's basic framework

First you need to install the wrapped plugin yarn add umi-plugin-stillness react-stillness-component;

Next, use it in .umirc.ts:

import { defineConfig } from 'umi';

export default defineConfig({
nodeModulesTransform: {
type: 'none',
},
routes: [
{
exact: false,
path: '/',
component: '@/layouts/index',
routes: [
{
exact: false,
path: '/home',
component: '@/pages/home',
stillness: true,
routes: [
{
path: '/home/a',
component: '@/pages/a',
stillness: true,
},
],
},
{ path: '/about', component: '@/pages/about', stillness: true },
{ path: '/list', component: '@/pages/list' },
],
},
],
stillness: {},
});

Add stillness:true to the nodes that need to be cached

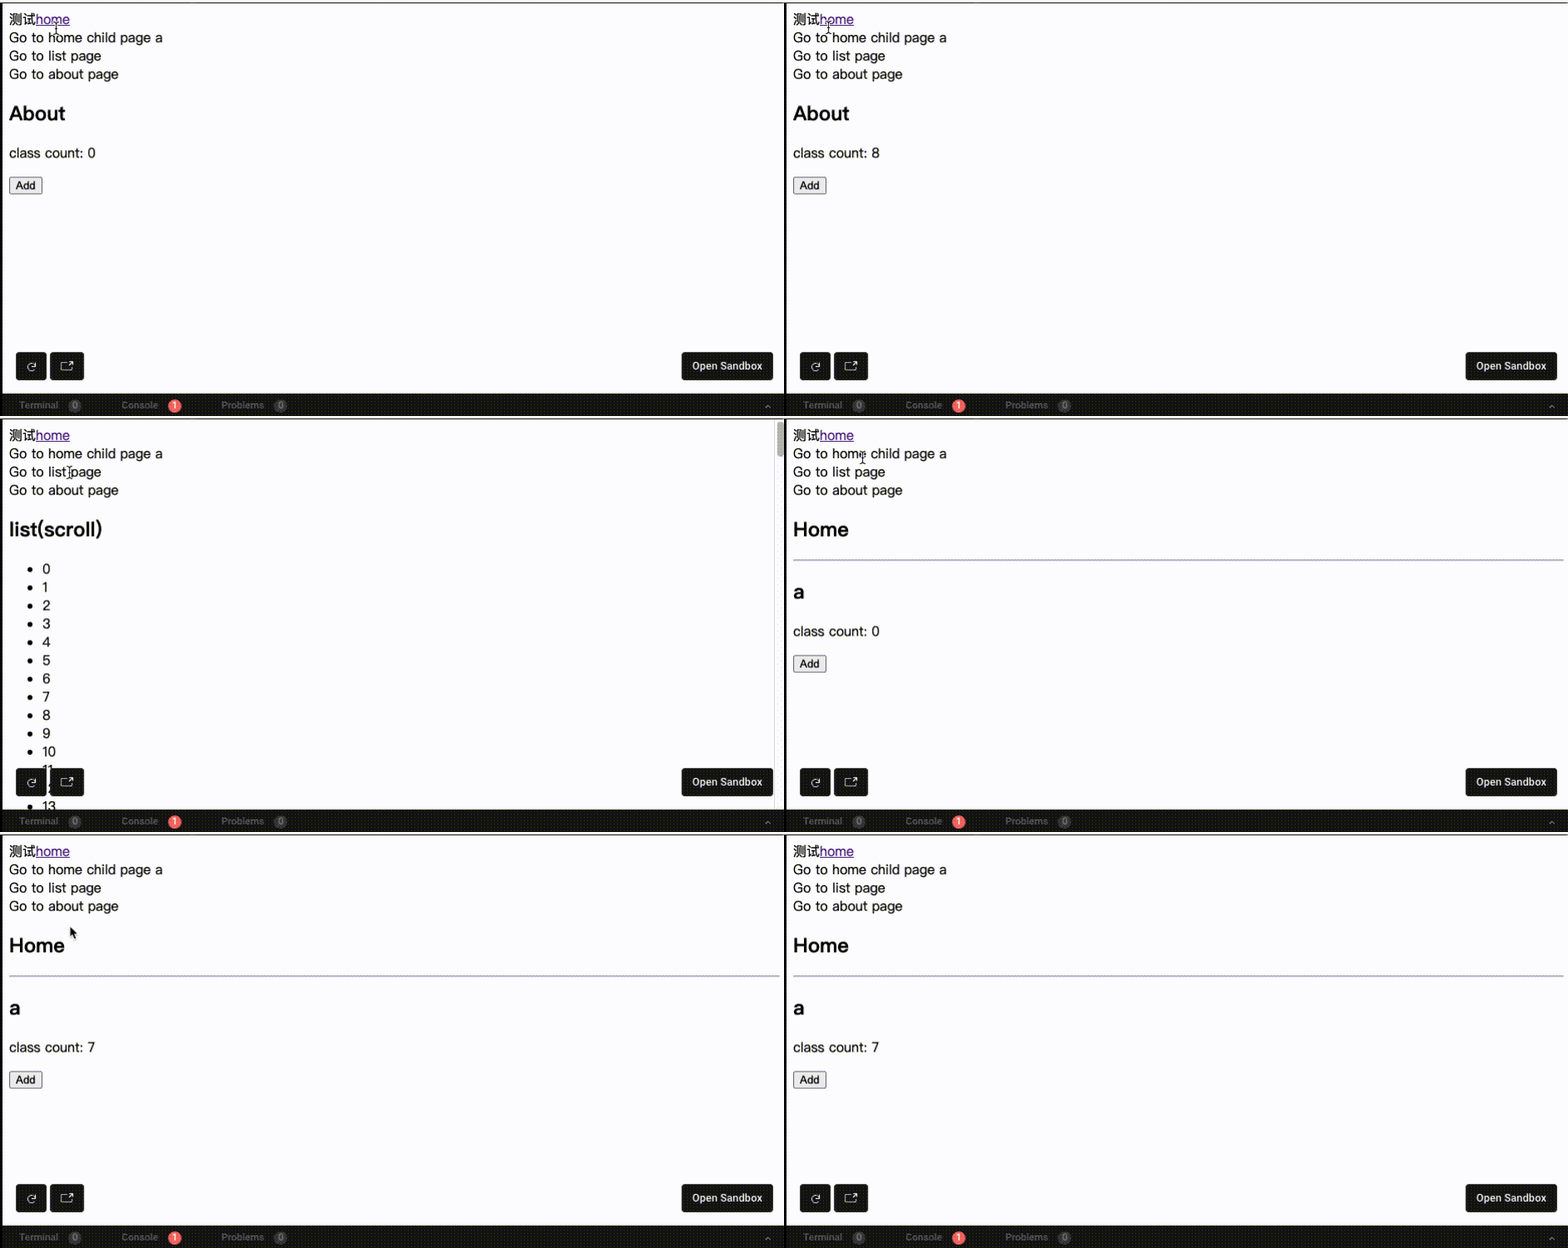
Effect:

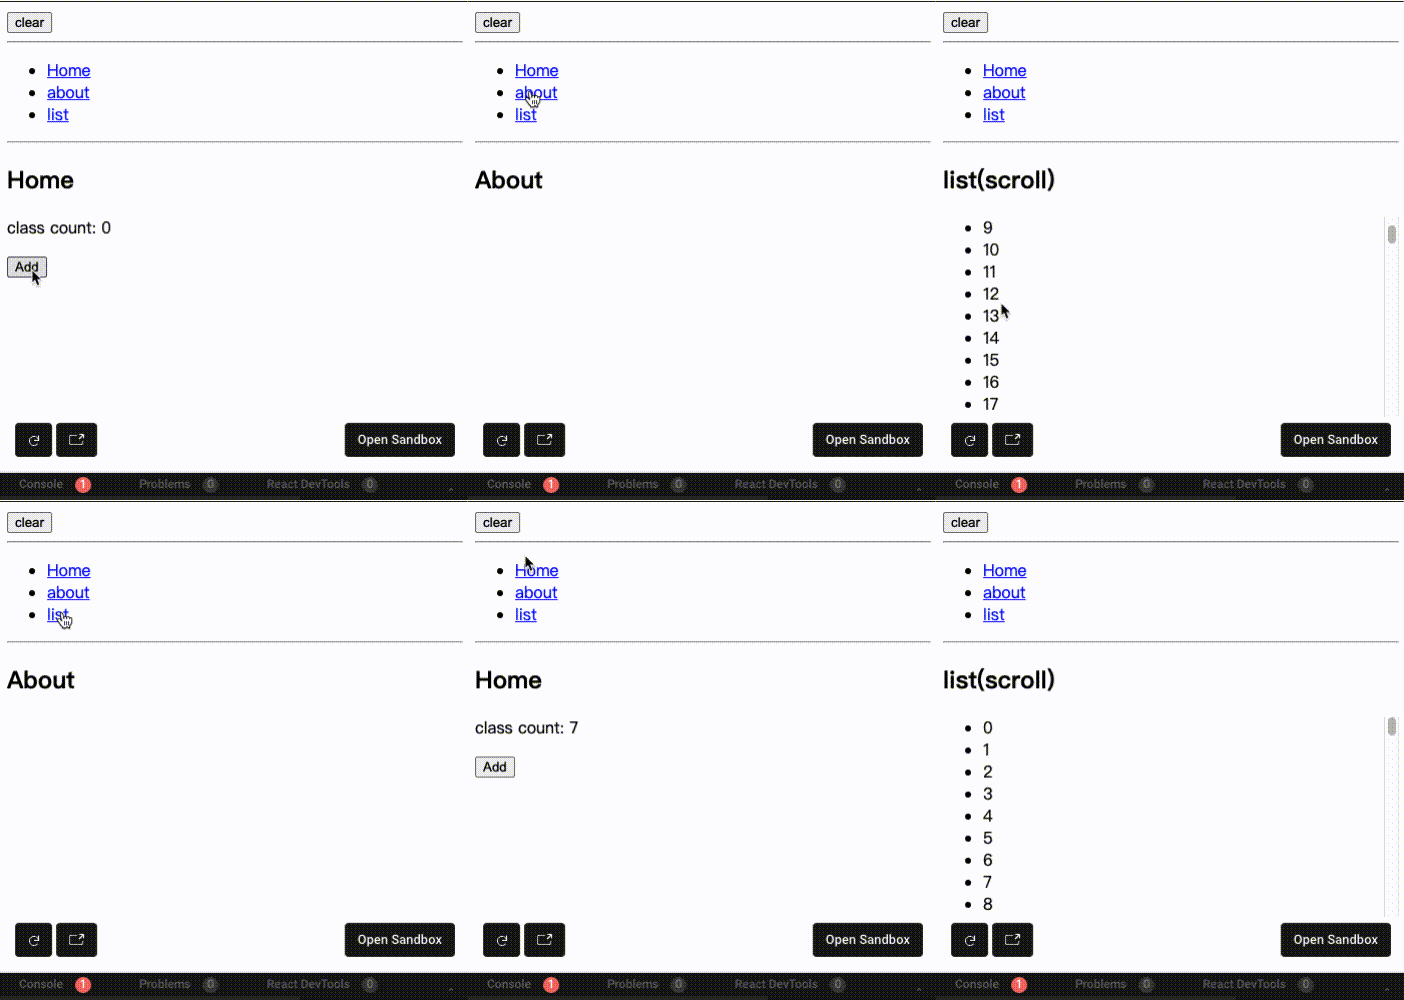
umi demo

The most important thing is to customize the <Switch> component, use the modifyRendererPath capability, redefine the new renderer, and then use the react-route-v5 similar modification method, you can achieve the effect. The downside is that it needs to be synchronized and updated in time, for example, the new react18 related capabilities, the author has not yet updated up.

Online address, you can debug it yourself

4. and the author's own more interested in next.js framework

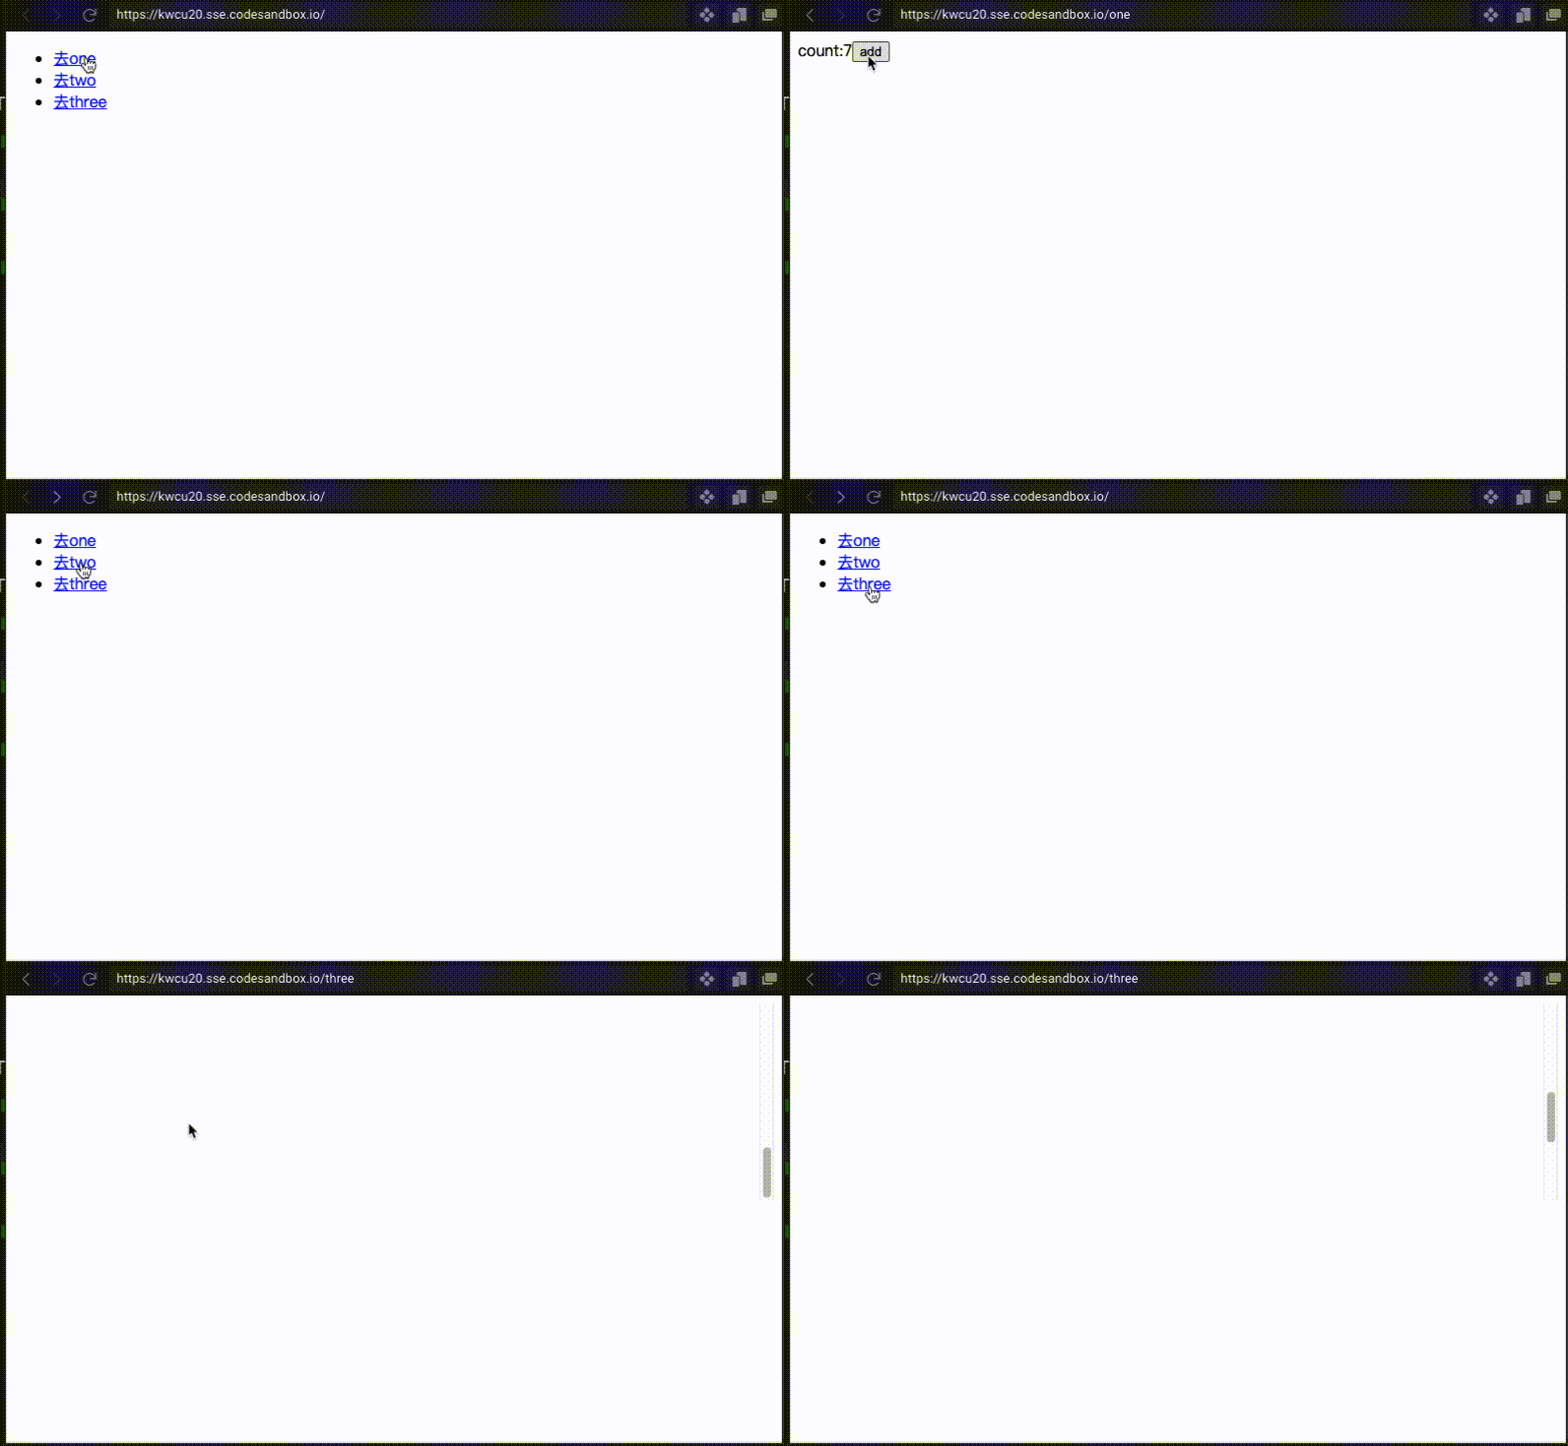
nextjs is relatively special, the file routing system can not be modified externally, therefore, customize the _app.js, by adding StillnessSwitch component, simply turn the routing components under it into stationary components.

import React, { useState, useEffect } from 'react';
import { useRouter } from 'next/router';
import { Offscreen } from 'react-stillness-component';

function matchPath(pathname, routes) {
const result = routes.find(({ path }) => path === pathname) || null;

return result;
}

const StillnessSwitch = (props) => {
const { Component, pageProps } = props;
const router = useRouter();
const [stillnessRoutes, setStillnessRoutes] = useState([]);
const [route, setRoute] = useState([]);

useEffect(() => {
if (pageProps.stillness) {
!matchPath(router.pathname, stillnessRoutes) &&
setStillnessRoutes([
...stillnessRoutes,
{ Page: Component, _props: pageProps, path: router.pathname },
]);
setRoute([]);
} else {
setRoute([
{
Page: Component,
_props: pageProps,
path: router.pathname,
},
]);
}
}, [Component, router.pathname]);

return (
<>
{stillnessRoutes.concat(route).map(({ Page, _props, path }) => {
if (_props.stillness) {
return (
<Offscreen
key={path}
type={path}
visible={path === router.pathname}
>
<Page {..._props} />
</Offscreen>
);
}

return <Page {..._props} />;
})}
</>
);
};

export default StillnessSwitch;

nextjs demo

online address, you can debug it yourself

Summary

This article describes in detail how to achieve the effect of keep-alive in react, and describes in detail the specific ideas, the author actually wanted to introduce the automation testing of components, but later in the actual scenario encountered this demand, then simply the first component to achieve, and then use the actual components to complete the front-end testing. This is "front-end how to do component testing" of the opening, if there are any questions, welcome to discuss together.